Serialport Access with Electron
This blog post is meant to document the process of developing an application using Electron. I won’t delve too deep into the logistics of how Electron works, however I’ll include some resources that I found useful below. The structure of this post will be a mix of tutorial and insight.
Electron: Quick Start Guide
Node Serialport: Serialport Docs
MBED PC-USB: Board to PC communication over USB
Steven Lambert: Packaging Electron
Gustavo Machado: Node.js via Serialport
The Setup
It goes without saying—verify that you have Node.js on your machine. From here, we have a few options as to how we want to start our project:
Build Project Directory
- Build Electron project from scratch
# Create and go to repository
$ mkdir <project-name> && cd <project-name>
# Install the dependencies and run to verify proper setup
$ npm install && npm start
- Clone a prebuilt Electron repo
# Clone the Quick Start repository or the Serialport repository
$ git clone https://github.com/electron/electron-quick-start or https://github.com/serialport/electron-serialport.git
# Go into the repository
$ cd electron-quick-start or electron-serialport
# Install the dependencies and run to verify proper setup
$ npm install && npm start
If this is your first time developing an electron application I recommend trying to build it from scratch since I think you’ll get a lot out of having to set up the renderer(s) and main processes. As for this project, I found that the serialport library can be a little finicky in its installation and linking, so you can either follow the setup below verbatim or clone the pre-configured electron-serialport repo.
Install Serialport
Given that you have not cloned the electron-serialport repo, install the serial port library.
# Install the serialport library as a dependency
$ npm install --save serialport
You’ll notice that a node_modules dir will appear, with serialport within. If you compiled with a different version of npm previously, you may need to rebuild the library using a tool such as electron-rebuild. I personally recommend doing this as when I first installed the serialport library, rebuilding the project is what linked the directory correctly.
# Install the electron-rebuild library as a developer dependency
$ npm install --save-dev electron-rebuild
# Run electron-rebuild in just the root directory of the project
$ ./node_modules/.bin/electron-rebuild
$ npm rebuild
To quickly verify that the serialport library was properly installed and linked, create a new javascript file with the following program and run it with node:
var sp = require("serialport");

sp.list(function (err, ports) {
  console.log(ports);
});
Configure main.js & preload.js
Finally, we have to specify the entry point into the application (main.js) which will control the application lifecycle, renderer(s), and native OS interactions. Also, we are going to want to define a preload script (preload.js) which will bridge both Node.js and our application.
We’ll start with main.js:
First we are going to import the modules that we will be using to run our application. The app and BrowserWindow modules of the electron package allow us to manage the runtime of renderer processes and control the application lifecycle. path provides utility functions for file paths, while url provides utilities for URL resolution and parsing.
const electron = require("electron");
// Module to control application life.
const app = electron.app;
// Module to create native browser window.
const BrowserWindow = electron.BrowserWindow;

const path = require("path");
const url = require("url");
The following is a fairly standard setup for window creation—to which there are many different ways to implement. Several things to note:
-
The main application window of our program is created, with our preload.js having run in this process. Then the renderer (index.js in our case) is loaded into that primed window.
-
DevTools are currently disabled, however by un-commenting
mainWindow.webContents.openDevTools()you can more effectively and efficiently edit the html and css of your renderer process(es). -
app.allowRendererProcessReuse=falseis a must in order to load the serialport library into the renderer process. It has been marked as a deprecated flag on the Github Issues page, however it still appears to be necessary in some builds. -
Presented are two ways of quitting the app: the first, which is commented, is the standard for ending application processes in MacOS—application remains active until explicitly terminated with Cmd-Q; the second, which is not commented, terminates the application once all windows are closed. Since this application is quite small and lacks many background processes, I elected to use the latter of the two conventions.
// Keep a global reference of the window object, if you don't, the window will
// be closed automatically when the JavaScript object is garbage collected.
let mainWindow;

function createWindow() {
  // Create the browser window.
  mainWindow = new BrowserWindow({
    width: 500,
    height: 600,
    webPreferences: {
      nodeIntegration: true,
      preload: path.join(__dirname, "preload.js"),
    },
  });

  // and load the index.html of the app.
  mainWindow.loadURL(
    url.format({
      pathname: path.join(__dirname, "index.html"),
      protocol: "file:",
      slashes: true,
    })
  );

  // Open the DevTools.
  //mainWindow.webContents.openDevTools()

  // Emitted when the window is closed.
  mainWindow.on("closed", function () {
    // Dereference the window object, usually you would store windows
    // in an array if your app supports multi windows, this is the time
    // when you should delete the corresponding element.
    mainWindow = null;
  });
}

// This is required to be set to false beginning in Electron v9 otherwise
// the SerialPort module can not be loaded in Renderer processes like we are doing
// in this example. The linked Github issues says this will be deprecated starting in v10,
// however it appears to still be changed and working in v11.2.0
// Relevant discussion: https://github.com/electron/electron/issues/18397
app.allowRendererProcessReuse = false;

// This method will be called when Electron has finished
// initialization and is ready to create browser windows.
// Some APIs can only be used after this event occurs.
app.on("ready", createWindow);

// Quit Options:
// Quit when all windows are closed.
// app.on('window-all-closed', function() {
//     // On OS X it is common for applications and their menu bar
//     // to stay active until the user quits explicitly with Cmd + Q
//     app.quit()
// })
app.on(
  "window-all-closed",
  () => process.platform !== "darwin" && app.quit() // "darwin" targets macOS only.
);

app.on("activate", function () {
  // On OS X it's common to re-create a window in the app when the
  // dock icon is clicked and there are no other windows open.
  if (mainWindow === null) {
    createWindow();
  }
});

// In this file you can include the rest of your app's specific main process
// code. You can also put them in separate files and require them here.
Finally, we can move on to configuring preload.js:
The goal with the preload script is to simply grant access to additional Node.js APIs by exposing them from your preload script. In our case this means linking the import statement from the renderer process to the serialnode library in node_modules.
Note: Electron utilizes chromium to display web content (ie the window in which our application lives)
// All of the Node.js APIs are available in the preload process.
// It has the same sandbox as a Chrome extension.
window.addEventListener("DOMContentLoaded", () => {
  for (const type of ["chrome", "node", "electron"]) {
    replaceText(`${type}-version`, process.versions[type]);
  }

  document.getElementById("serialport-version").innerText =
    require("serialport/package").version;
});
Create renderer process
Now that we have our project fully setup, it’s time to write the renderer process of our project. This means dumping our desired html and css into a .html file (in our case we’ll call this index.html). We’ll also want to include some javascript so that our application has further functionality other than looking pretty. However, before delving into the javascript, lets design how the application will look.
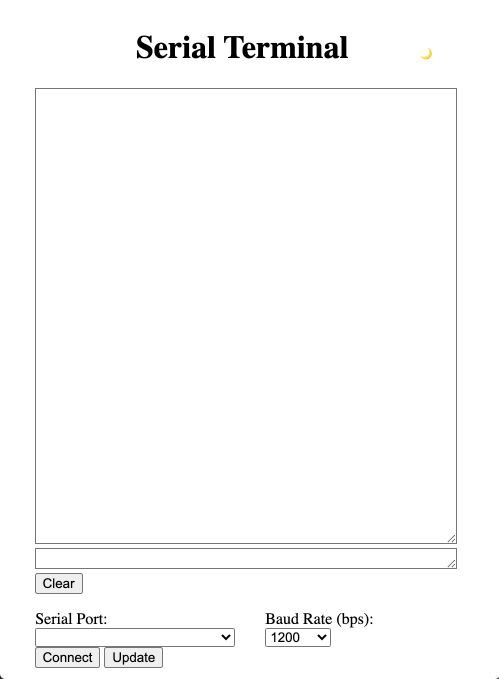
Design and modify index.html
As stated above, we will begin by designing the look and feel of our application first, such that when we begin writing the javascript there will be “physical” representations of what we are designing functionality for.
The below html is the body of my application and includes all of the widgets and inputs needed to communicate/interface with the connected serialport devices. Here is the feature list I devised prior to development:
-
Incoming & Outgoing data log
-
Outgoing data input
-
Auto-scrolling for data log
-
Clear button for the data log
-
Port list for all serialport devices currently connected to the computer
-
Refresh button the port list
-
Baud rate list
-
Connect button the port and baud rate lists
-
Dark/Light mode
Given the features above, I wrote the html and css below to reflect the desired functionality:
<!DOCTYPE html>
<html>
  <head>
    <meta charset="UTF-8" />
    <title>SerialPort Console</title>
    <style>
      table {
        border-collapse: collapse;
      }

      table,
      th,
      td {
        border: 1px solid black;
      }

      .btn-circle {
        width: 30px;
        height: 30px;
        text-align: center;
        padding: 6px 0;
        font-size: 12px;
        line-height: 1.428571429;
        border-radius: 15px;
        background-color: transparent;
        border-color: transparent;
        margin-left: 5em;
      }
    </style>
  </head>

  <body id="body" style="background-color:white">
    <h1
      id="title"
      style="text-align: center;display: inline-block;padding-left: 4em;"
    >
      Serial Terminal
    </h1>
    <button id="Dbutton" name="light" class="btn btn-default btn-circle">
      🌙
    </button>
    <br />
    <textarea
      rows="30"
      cols="50"
      id="incomingData"
      style="margin-left: 2em;"
    ></textarea>
    <br />
    <textarea
      rows="1"
      cols="50"
      id="inputText"
      style="margin-left: 2em;"
    ></textarea>
    <br />
    <input
      id="Cbutton"
      type="submit"
      name="button"
      value="Clear"
      style="margin-left: 2em;"
    />
    <br />
    <div id="error"></div>
    <div id="ports"></div>
    <ul id="thelist"></ul>
    <label id="pllbl" for="portlist" style="margin-left: 1.7em;"
      >Serial Port:</label
    >
    <label id="brlbl" for="baudrates" style="margin-left: 9.6em;"
      >Baud Rate (bps):</label
    >
    <br />
    <select id="portlist" style="margin-left: 2em; width: 15em;"></select>
    <select id="baudrates" style="margin-left: 2em;">
      <option value="1200">1200</option>
      <option value="2400">2400</option>
      <option value="4800">4800</option>
      <option value="9600">9600</option>
      <option value="19200">19200</option>
      <option value="57600">57600</option>
      <option value="115200">115200</option>
    </select>
    <br />
    <input
      id="Sbutton"
      type="submit"
      name="button"
      value="Connect"
      style="margin-left: 2em;"
    />
    <input id="Ubutton" type="submit" name="button" value="Update" />
  </body>
</html>
Following this, we want to require the require that our javascript file runs alongside our html in the renderer process. To do so we can simply include the following at the end of our <body> in index.html :
<script>
  require("./renderer.js");
</script>
From here we are ready to flesh out the functionality of our application.
Fun with renderer.js
Now we can get to the fun part of our project: writing the script to interact with the serialport library. Lets first begin by importing the required libraries, initializing a few global variables for later down the line, and writing an asynchronous function to retrieve the connected serial port devices.
const serialport = require("serialport");
const Readline = serialport.parsers.Readline;

var opSys = process.platform;
var selectedPort = "";
var bd = 9600;
var sp;

async function listSerialPorts() {
  await serialport.list().then((ports, err) => {
    if (err) {
      document.getElementById("error").textContent = err.message;
      return;
    } else {
      document.getElementById("error").textContent = "";
    }
    console.log("ports", ports);

    if (ports.length === 0) {
      document.getElementById("error").textContent = "No ports discovered";
    }

    ports.forEach(function (port) {
      addelement(port.path);
    });
  });
}

function addelement(name) {
  var completelist = document.getElementById("portlist");
  completelist.innerHTML +=
    '<option value="' + name + '">' + name + "</option>";
}
We first begin by importing the serialport library in as const serialport so that we can access the various functions provided in the library. From there we initialize the readline parser for the serial ports as const Readline—this will be used as a delimiter for the incoming data, constraining the amount text read in any given package. From there we define the operating system that is currently running the application—this is important for later on when we try to communicate with a selected device. Also, we declare several variables used to store the current serial connection information, such as name and baud rate.
As part of our system to update the port list with currently connected serial devices, I have written a small function which grabs the current serialport list and parses the elements. Below the listSerialPorts() function is a helper function that adds an input string to the port list element of index.html.
Now that we have our functions to grab and list all available serial ports, we will write the update button functionality so that we can manually reset the serial port list elements.
document.getElementById("Ubutton").onclick = function () {
  var completelist = document.getElementById("portlist");
  completelist.innerHTML = "";
  listSerialPorts();
};
From here we can complete the port connection scheme by writing the script for the connection button. The goal is to collect all of the information needed to initialize and communicate with the port. Since the serialport library is doing most of the heavy lifting we can simply write the following:
document.getElementById("Sbutton").onclick = function () {
  selectElement = document.querySelector("#portlist");
  selectedPort = selectElement.value;

  if (strcmp(opSys, "win32") == 1) {
    selectedPort = selectedPort.substring(8);
    selectedPort = "/dev/cu" + selectedPort;
  }

  bd = parseInt(document.querySelector("#baudrates").value);

  document.getElementById("incomingData").value +=
    "\nPort Connected: " + selectedPort;
  document.getElementById("incomingData").value += "\nBaud Rate: " + bd + "\n";

  sp = new serialPort(selectedPort, {
    baudRate: bd,
  });

  var parser = sp.pipe(new Readline({ delimiter: "\r\n" }));
  parser.on("data", addText);
  document.onkeypress = keyPressFunction;
};

function strcmp(a, b) {
  if (a.toString() < b.toString()) return -1;
  if (a.toString() > b.toString()) return 1;
  return 0;
}
The first action we take upon clicking the button is grabbing the selected portlist item. Given the operating system, we may need to change the serial port pathname in order to send data to the selected device. This is not an issue on windows, however in Unix and Linux environments each serial communication port has two parts to it, a tty.* and a cu.*. The difference between the two is that a TTY device is used to call into a device/system, and the CU device is used to call out of a device/system. Given that the os is Linux/Unix based, we simply cut and add the desired /dev entry.
Once we’ve established the serial port that we will be connecting to, we grab the selected baud rate. With both the serial port and baud rate we can finally create a serial port object and a parser for incoming data. From there we can tie the parser to our addText function, displaying data read from the serial port in the incomingData textarea.
Having written what’s needed to connect to a desired serialport, we will now write the functions responsible for reading and writing data from and to the connected device.
//append incoming data to the textarea.
async function addText(event) {
  document.getElementById("incomingData").value += "\n" + event;
  var textarea = document.getElementById("incomingData");
  textarea.scrollTop = textarea.scrollHeight;
}

async function writeonSer(data) {
  //Write the data to serial port.
  sp.write(data, function (err) {
    if (err) {
      return console.log("Error on write: ", err.message);
    }
    console.log("message written");
  });
}

function keyPressFunction(e) {
    var charCode = typeof e.which == "number" ? e.which : e.keyCode;
    if (charCode == 13) {
        writeonSer(document.getElementById("inputText").value + "\r"); //  + "\r\n"
        document.getElementById("inputText").value = "";
        return false;
    }
}
The addText function is relatively straightforward, with the only notable feature being that we update the incomingData textarea so that the latest data read is always on screen. As for the writeonSer function, we are simply leveraging the serialport library’s write function, catching any errors and printing them to a local terminal. The writeonSer function is called when the user presses the “enter” key in the inputText textarea.
Finally, we define the onclick functionality of the dark/light theme button. These functions simply modify the inline css of our index.html file.
document.getElementById("Cbutton").onclick = function () {
    document.getElementById("incomingData").value = "";
};

document.getElementById("Dbutton").onclick = function () {
    if (document.getElementById("Dbutton").name == "light") {
        document.getElementById("Dbutton").innerHTML = "🌞";
        document.getElementById("Dbutton").name = "dark";
        darkMode();
    } else {
        document.getElementById("Dbutton").innerHTML = "🌙";
        document.getElementById("Dbutton").name = "light";
        lightMode();
    }
};

function darkMode() {
    document.getElementById("body").style.backgroundColor = "#343a40";
    document.getElementById("title").style.color = "white";
    document.getElementById("pllbl").style.color = "white";
    document.getElementById("brlbl").style.color = "white";
    document.getElementById("incomingData").style.backgroundColor = "#dbe9f4";
    document.getElementById("inputText").style.backgroundColor = "#dbe9f4";
}

function lightMode() {
    document.getElementById("body").style.backgroundColor = "white";
    document.getElementById("title").style.color = "black";
    document.getElementById("pllbl").style.color = "black";
    document.getElementById("brlbl").style.color = "black";
    document.getElementById("incomingData").style.backgroundColor = "white";
    document.getElementById("inputText").style.backgroundColor = "white";
}
Write test script for serial device
Given that we’ve been testing the functionality of our application throughout development, we should finished with everything we sought out to implement. From here we should test our application with an actual use case—I have elected to write a simple arduino script.
char receivedChar;
bool newData = false;

void readChar();
void writeData();

void setup() {
    Serial.begin(9600);
    Serial.println("~Arduino connected~");
}

void loop() {
    readChar();
    writeData();
}

void readChar() {
    if (Serial.available() > 0) {
        receivedChar = Serial.read();
        newData = true;
    }
}

void writeData() {
    if (newData == true) {
        Serial.print("Echo ... ");
        Serial.println(receivedChar);
        newData = false;
    }
}
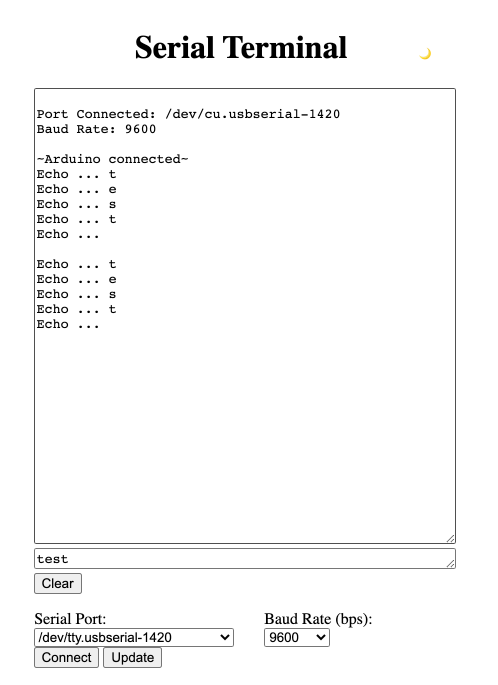
This script simply reads in a single char and echoes it back to the application. The goal of this test is to simply prove the functionality of the application, however it should be fairly evident how it can be modified for reading/writing full strings of text.
Build and package for distribution
Now that we have design, implemented, and tested our application we can finally build and package it. For this project we will be using electron-forge to handle packaging.
First we will need to install Wine, which is a program that lets non-Windows operating systems run Windows software. Since Electron packaging tools will use Windows APIs to build the Windows package, we will want to install this program—a tutorial can be found here how to install Wine on Mac.
Once we have Wine up and running, we should install electron-forge into our project:
# First install electron-forge using npm
$ npm install --save-dev @electron-forge/cli
# Then import the package to configure electron-forge
$ npx electron-forge import
At this point you should verify that the import was successful by checking the package.json file. The import should have added a whole config section to the .json file, which defines how the application will be packaged. Once set up, you can run npm run make to build a Mac package and a zip file containing the Mac package of your app, assuming that you are on a Mac. This will not build a Windows and/or Linux package. If you are having difficulties with electron-forge, I have also had some success with electron-packager.
You will also want to create some icon art and include that in a separate assets directory in order to be packaged alongside the rest of the application. Here is a quick icon that I put to together for my application:
Each platform uses a different extension for the icon: .icns for Mac, .ico for Windows, and .png for Linux.
Thank you for reading this small venture of mine. I hope you found an inkling of it useful whether it be in a current or future project.